1. LLM 与 MCP 的交互方式 MCP 全程 Model Context Protocol,是一种用于让 LLM 连接到外部系统、工具的一种标准协议。比如我们想让 LLM 获取未来几天的天气状况,就可以提供一个查询天气的工具,LLM 处理我们请求时就可以调用这个工具,然后结合工具的返回结果组织好语言后给予我们回复。
那么我们如何让 LLM 知道我们有哪些工具呢,LLM 又是如何调用这些工具的?这就要拆解聊天应用与 LLM 具体的交互了:
首先用户在展开一段对话时,APP 将用户会话的内容传给大模型外,还会告知大模型我们当前有哪些可用的工具函数,这些函数的参数是什么,传递给大模型的信息就类似:
1
2
3
4
5
6
7
8
角色: user 内容: 帮我查询一下坐标 (39, 116) 未来几天的天气 可用函数: - get_weather(latitude, longitude) - 函数描述:获取未来 3 天的天气 - 参数描述: - latitude:经度,类型为数字,取值范围 -90~90 - longitude:纬度,类型为数字,取值范围 -180~180
当 LLM 拿到这些信息后,支持 Function Call 的模型会去主动考虑接下来该调用什么函数,并且在响应中告知当前要调用哪个函数,比如如果用户询问未来几天的天气,LLM 也知道 get_weather 函数可用,就会回复如下响应,来请求调用函数:
1
2
3
4
5
6
7
8
角色: "assistant" 内容: "" 函数调用: - 函数名:get_weather - 函数参数: - latitude: 39 - longitude: 116 - 调用ID: 1
当 APP 判断 LLM 的响应存在函数调用请求,就会向 MCP 服务发起一个对应函数的调用请求,并将参数透传过去, 等待 MCP 服务的函数响应结果,等结果返回后将前面的上下文内容一起打包作为一个新的请求发送给 LLM,请求类似于:
1
2
3
4
5
6
7
8
9
10
11
12
13
14
15
16
17
18
19
20
21
角色: user 内容: 帮我查询一下坐标 (39, 116) 未来几天的天气 可用函数: - get_weather(latitude, longitude) - 函数描述:获取未来 3 天的天气 - 参数描述: - latitude:经度,类型为数字,取值范围 -90~90 - longitude:纬度,类型为数字,取值范围 -180~180 ---- 角色: "assistant" 内容: "" 函数调用: - 函数名:get_weather - 函数参数: - latitude: 39 - longitude: 116 - 调用ID: 1 ---- 角色: "tool" 内容: 1月1日 晴天;1月2日 阴天;1月3日 小雨。 调用ID: 1
至此,LLM 已经完整获取了用户意图与函数的返回结果,就可以构造回复给用户了:
1
2
角色: "assistant" 内容: "未来几天的天气状况如下:1月1日 晴天;1月2日 阴天;1月3日 小雨。未来几天出门要记得带伞哦!"
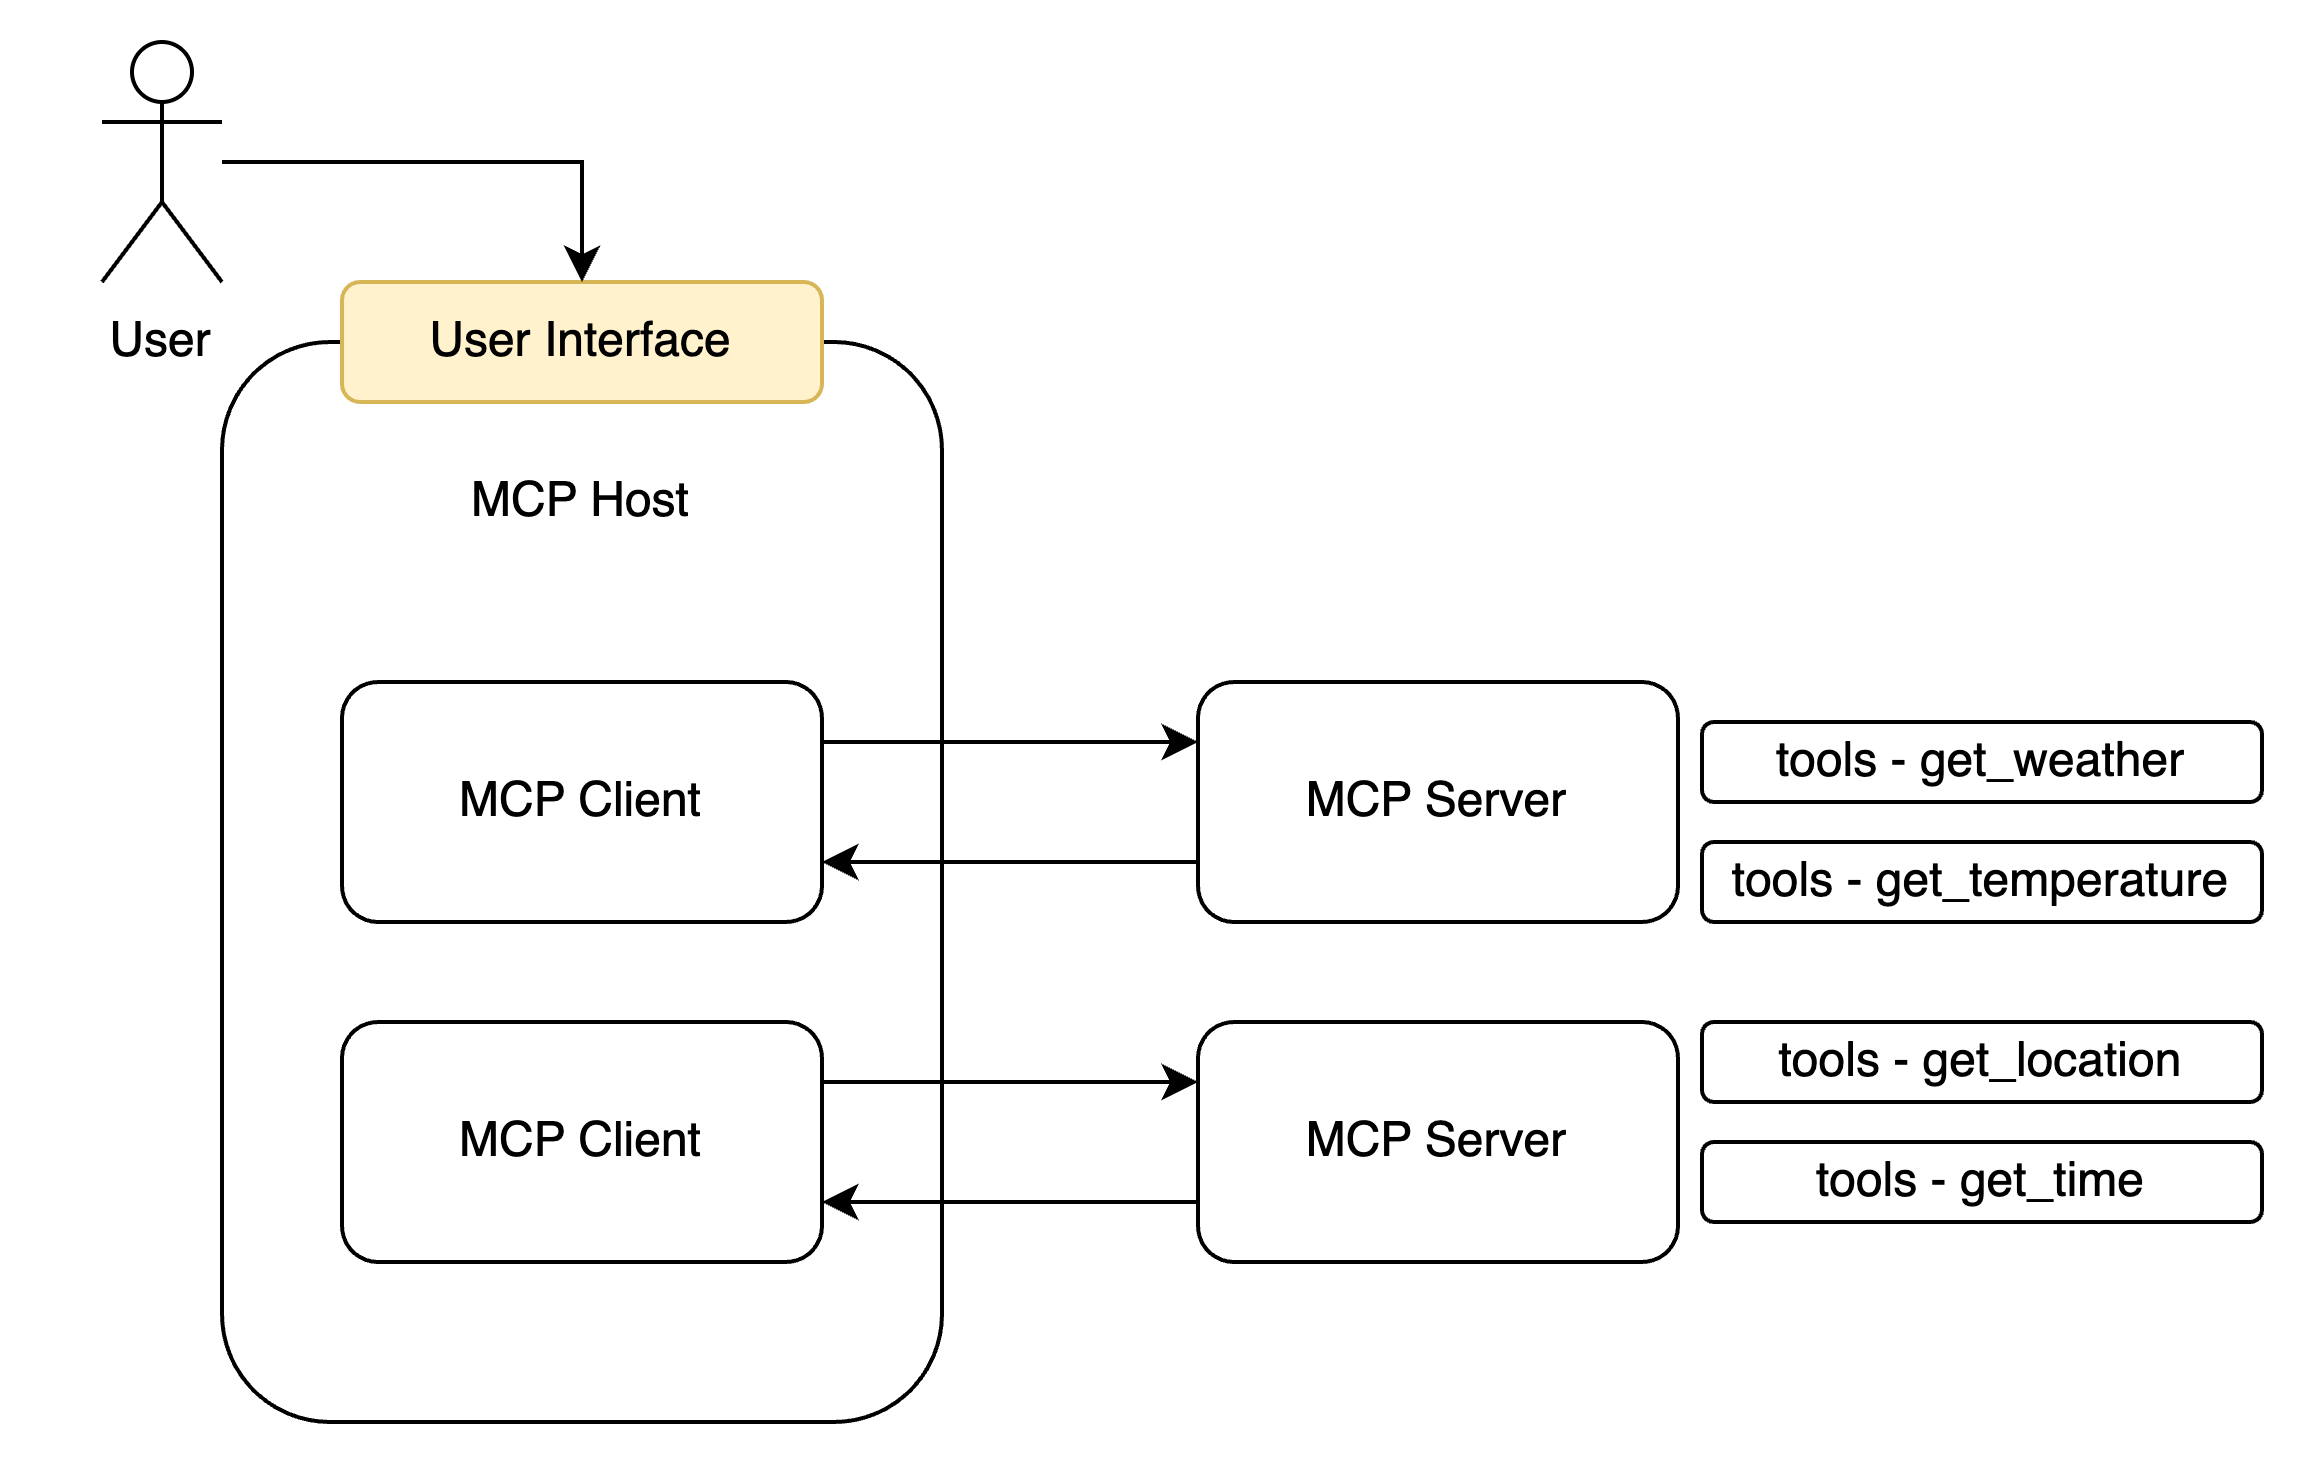
2. MCP Server、MCP Client、MCP Host 在前面的示例中,我们可以发现在整个过程中的参与者除了 LLM 和用户之外,还有 MCP 的提供者和调用者,我们将其称为 MCP Server 与 MCP Client。
MCP Server 以服务的形式对外暴露函数(tools)、资源(resouce)、Prompts 等内容(MCP 不仅可以提供 tools 还提供其他内容,但是我们只先搞清楚 tools 即可),而 MCP Client 则负责与 Server 进行交互,比如发起一个函数的调用和处理结果的返回。一个聊天软件可以同时创建多个 MCP Client 来连接多个 MCP Server,因此聊天软件即为一个 MCP Host:
3. MCP Server 的实现 构建一个 MCP Server 其实是比较简单的,官方已经给我们提供好了 SDK 包,可以快速的搭建其一个 MCP 服务提供给 Claude Desktop、Github Copliot、Cherry Studio 这种支持 MCP 连接的 LLM 聊天软件使用。以 Node 为例,安装 @modelcontextprotocol/sdk 即可快速开始。
在搭建前,我们要先简单了解一下 MCP 的连接方式(具体的通信方式我们后面再进一步拆解)。MCP Server 有以下两种链接模式:
基于本地的 stdio:在这种模式在,MCP Host(也就是聊天软件)会创建一个 MCP Client 以命令行指令的方式调用 node 或者 python 指令调用一个本地的 MCP Server 的脚本,亦或是使用 npm、uv 这种包管理工具实时下载一个 MCP Server 并运行。然后 MCP Server 与 MCP Client 以命令行标准输入输出的方式进行函数的调用和结果的接收。
基于网络的 streamable http:MCP Server 的线上调用模式,此时 MCP Server 会开启一个 http 服务器,MCP Client 将会通过 HTTP 请求/响应、亦或是 SSE 的方式与 MCP Server 进行双向通信,从而实现函数的调用与结果的接收。
stdio 我们先来实现一个比较简单的 stdio 模式:
1
2
3
4
5
6
7
8
9
10
11
12
13
14
15
16
17
18
19
20
21
22
23
24
25
26
27
28
29
30
31
32
33
34
35
36
37
38
39
40
41
42
43
44
45
46
47
48
49
50
51
52
53
54
55
56
57
58
59
60
61
62
63
64
65
66
import { McpServer } from "@modelcontextprotocol/sdk/server/mcp.js" ;import { StdioServerTransport } from "@modelcontextprotocol/sdk/server/stdio.js" ;import { z } from "zod" ;import { fetchWeatherForecast } from "./utils/weather.mjs" ;const server = new McpServer ({ name : "weather" , version : "1.0.0" , }); server.registerTool ( "get_forecast" , { description : "Get weather forecast for a location" , inputSchema : { latitude : z .number () .min (-90 ) .max (90 ) .describe ("Latitude of the location" ), longitude : z .number () .min (-180 ) .max (180 ) .describe ("Longitude of the location" ), }, }, async ({ latitude, longitude }) => { const forecast = await fetchWeatherForecast (latitude, longitude); const formattedForecast = forecast .map ((item ) => [ `Date: ${item.date} ` , `Temperature: ${item.temperature} ` , `Condition: ${item.condition} ` , `-------` , ]) .join ("\n" ); return { content : [ { type : "text" , text : formattedForecast, }, ], }; } ); async function main ( const transport = new StdioServerTransport (); await server.connect (transport); console .error ("Weather MCP Server running on stdio" ); } main ().catch ((error ) => { console .error ("Fatal error in main():" , error); process.exit (1 ); });
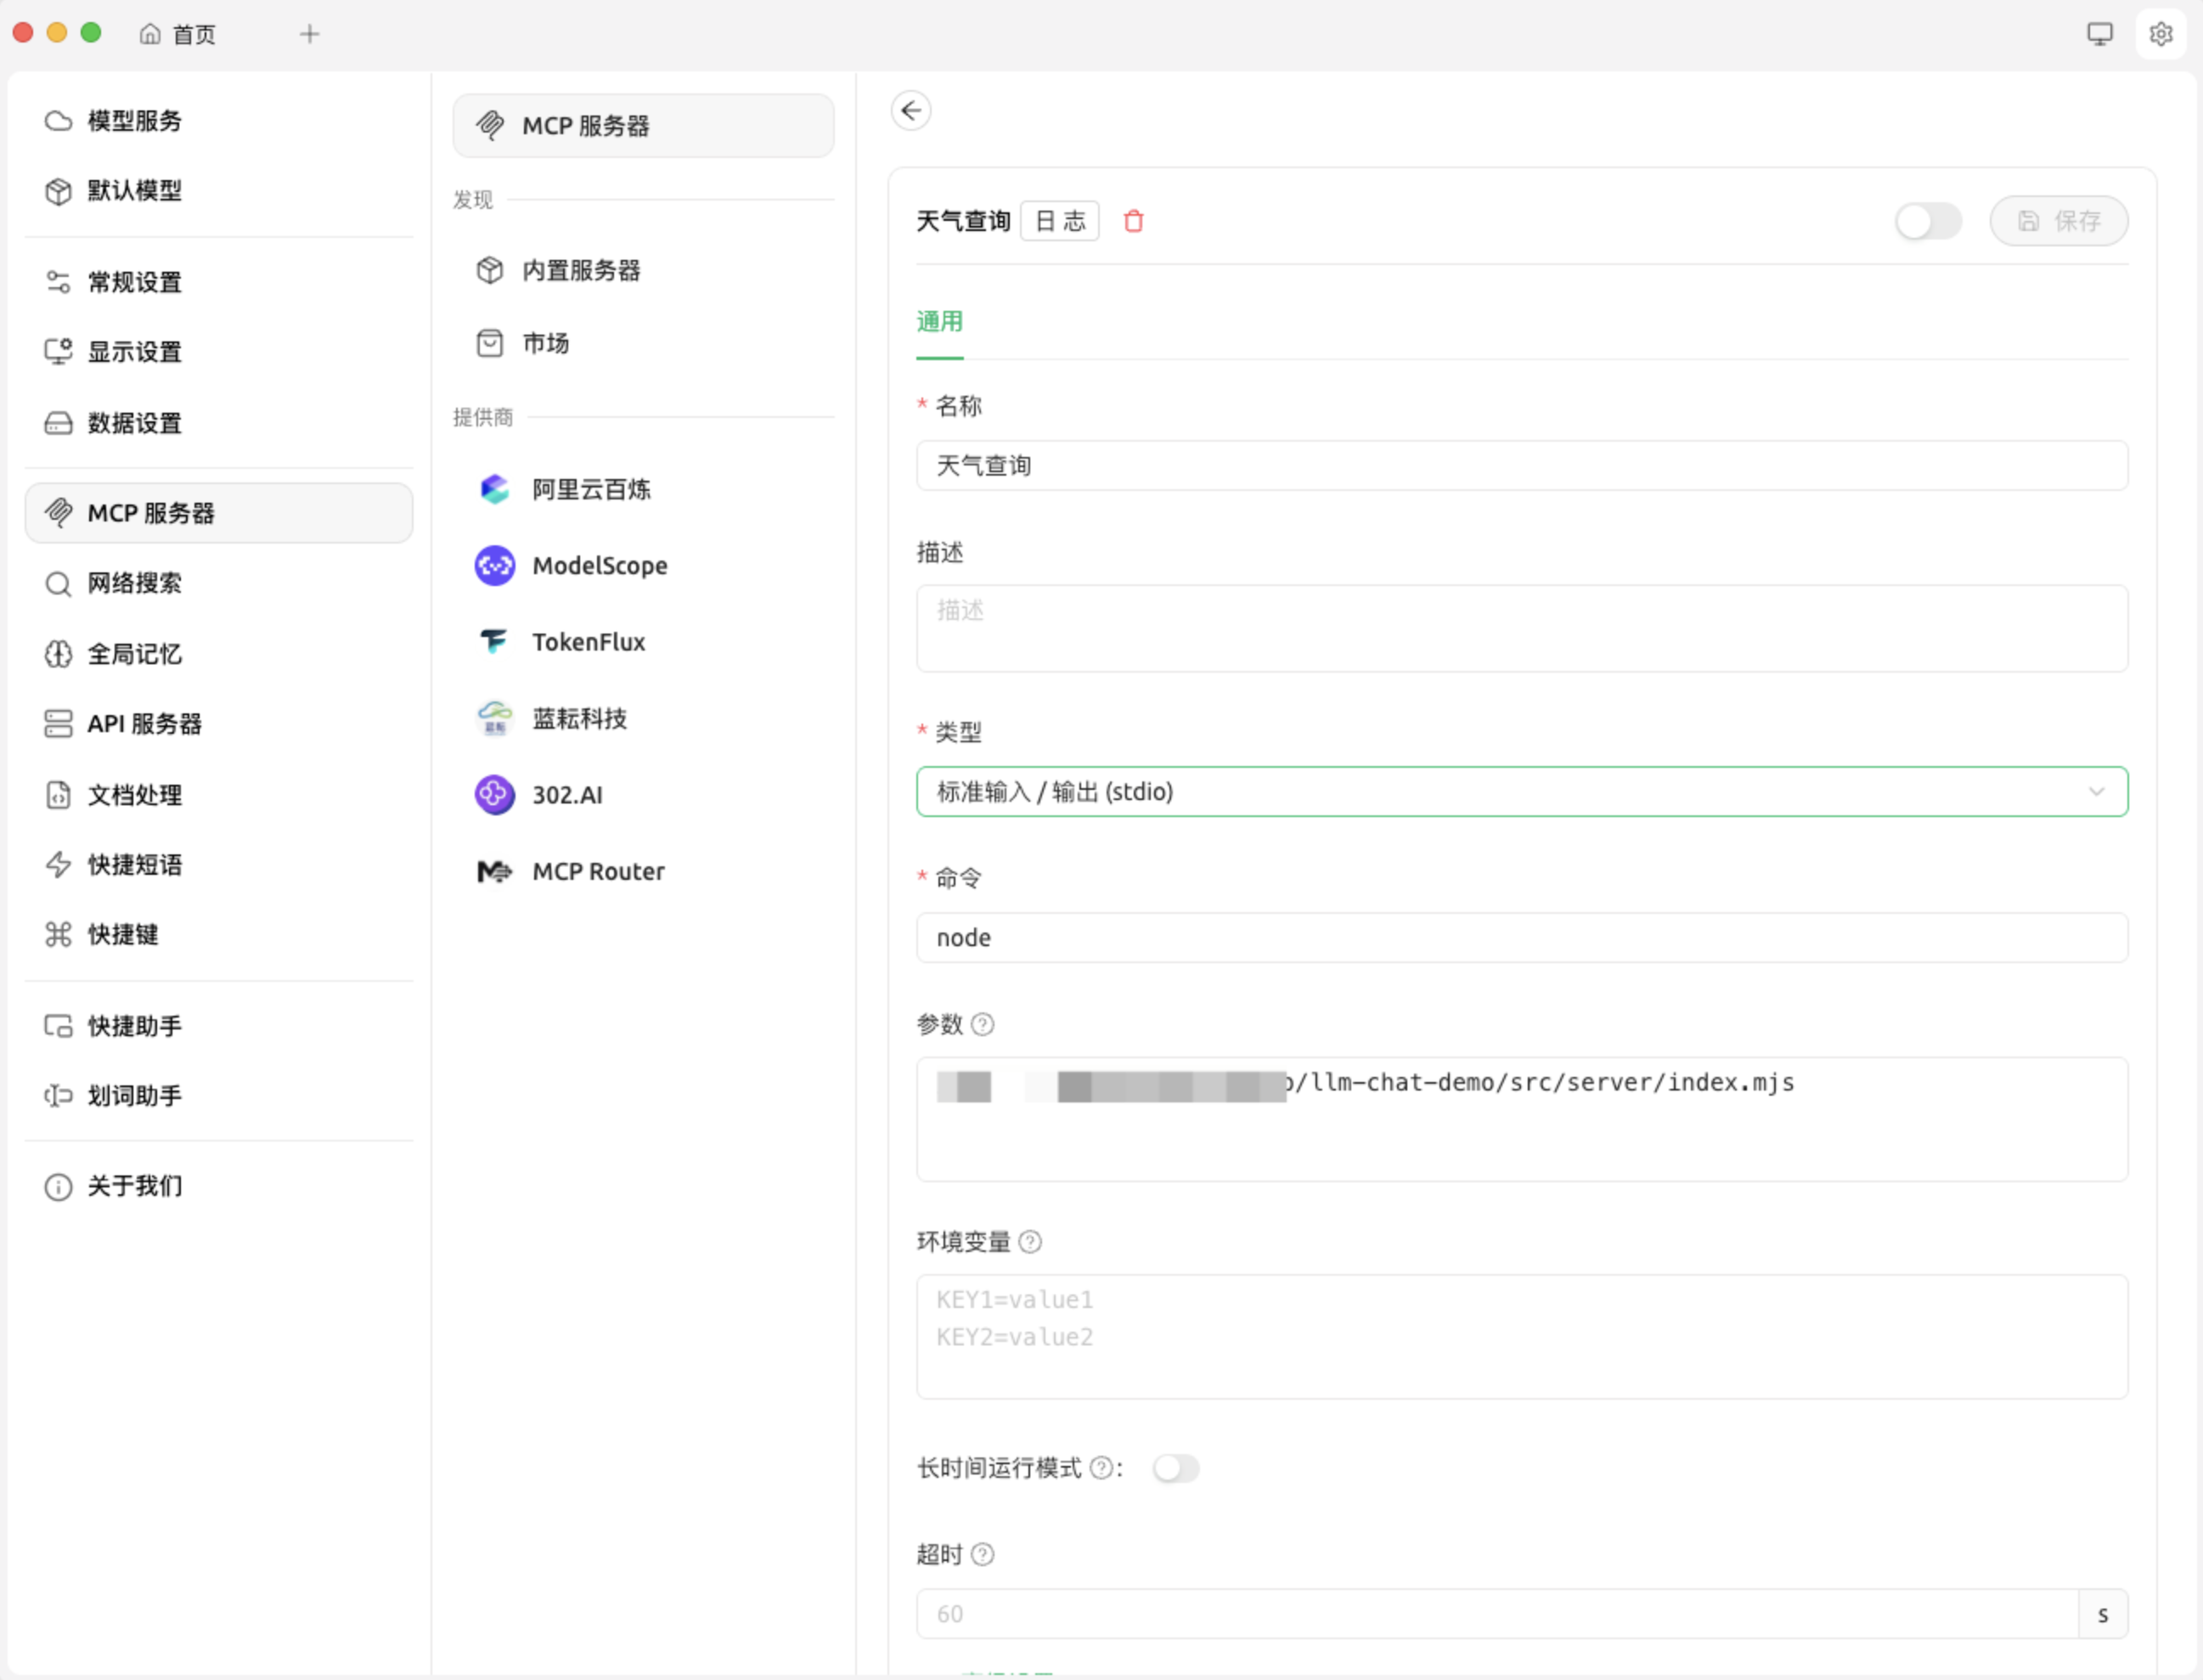
以 Cherry Studio 为例,我们进行如下配置,即使用 node 指令执行上面的脚本,然后点击开启按钮,当我们聊天时 LLM 就可以使用这个 MCP Server 了。
streamable http 那就会有同学问了,如果我想将我的 MCP 可以被远程连接改如何实现呢,那么就可以使用 streamable http 的方式进行实现。
示例代码如下(先不考虑鉴权的问题):
1
2
3
4
5
6
7
8
9
10
11
12
13
14
15
16
17
18
19
20
21
22
23
24
25
26
27
28
29
30
31
32
33
34
35
36
37
38
39
40
41
42
43
44
45
46
47
48
49
50
51
52
53
54
55
56
57
58
59
60
61
62
63
64
65
66
67
68
69
70
71
72
73
74
75
76
77
78
79
80
81
82
83
84
85
86
87
88
89
90
91
92
93
94
95
96
97
98
99
100
101
102
103
104
105
106
107
108
109
110
111
112
113
114
115
116
117
118
119
120
121
122
123
124
125
126
127
128
129
130
131
132
133
134
135
136
137
138
139
import { McpServer } from "@modelcontextprotocol/sdk/server/mcp.js" ;import { createMcpExpressApp } from "@modelcontextprotocol/sdk/server/express.js" ;import { StreamableHTTPServerTransport } from "@modelcontextprotocol/sdk/server/streamableHttp.js" ;import { isInitializeRequest } from "@modelcontextprotocol/sdk/types.js" ;import crypto from "crypto" ;import { z } from "zod" ;import { fetchWeatherForecast } from "./utils/weather.mjs" ;function getServer ( const server = new McpServer ({ name : "weather" , version : "1.0.0" , }); server.registerTool ( "get_forecast" , { description : "Get weather forecast for a location" , inputSchema : { latitude : z .number () .min (-90 ) .max (90 ) .describe ("Latitude of the location" ), longitude : z .number () .min (-180 ) .max (180 ) .describe ("Longitude of the location" ), }, }, async ({ latitude, longitude }) => { const forecast = await fetchWeatherForecast (latitude, longitude); const formattedForecast = forecast .map ((item ) => [ `Date: ${item.date} ` , `Temperature: ${item.temperature} ` , `Condition: ${item.condition} ` , `-------` , ]) .join ("\n" ); return { content : [ { type : "text" , text : formattedForecast, }, ], }; } ); return server; } const app = createMcpExpressApp ();const transports = {};const mcpPostHandler = async (req, res ) => { const sessionId = req.headers ["mcp-session-id" ]; if (sessionId) { console .log (`Received MCP request for session: ${sessionId} ` ); } else { console .log ("Request body:" , req.body ); } try { let transport = null ; if (sessionId && transports[sessionId]) { transport = transports[sessionId]; } else if (!sessionId && isInitializeRequest (req.body )) { transport = new StreamableHTTPServerTransport ({ sessionIdGenerator : () => crypto.randomUUID (), onsessioninitialized : (sessionId ) => { console .log (`Session initialized: ${sessionId} ` ); transports[sessionId] = transport; }, }); transport.onclose = () => { const sid = transport.sessionId ; if (sid && transports[sid]) { console .log ( `Transport closed for session ${sid} , removing from transports map` ); delete transports[sid]; } }; const server = getServer (); await server.connect (transport); await transport.handleRequest (req, res, req.body ); return ; } else { res.status (400 ).json ({ jsonrpc : "2.0" , error : { code : -32000 , message : "Bad Request: No valid session ID provided" , }, id : null , }); return ; } await transport.handleRequest (req, res, req.body ); } catch (error) { console .error ("Error handling MCP request:" , error); if (!res.headersSent ) { res.status (500 ).json ({ jsonrpc : "2.0" , error : { code : -32603 , message : "Internal server error" , }, id : null , }); } } }; app.post ("/mcp" , mcpPostHandler); const MCP_PORT = 8000 ;app.listen (MCP_PORT , (error ) => { if (error) { console .error ("Failed to start server:" , error); process.exit (1 ); } console .log (`MCP Streamable HTTP Server listening on port ${MCP_PORT} ` ); });
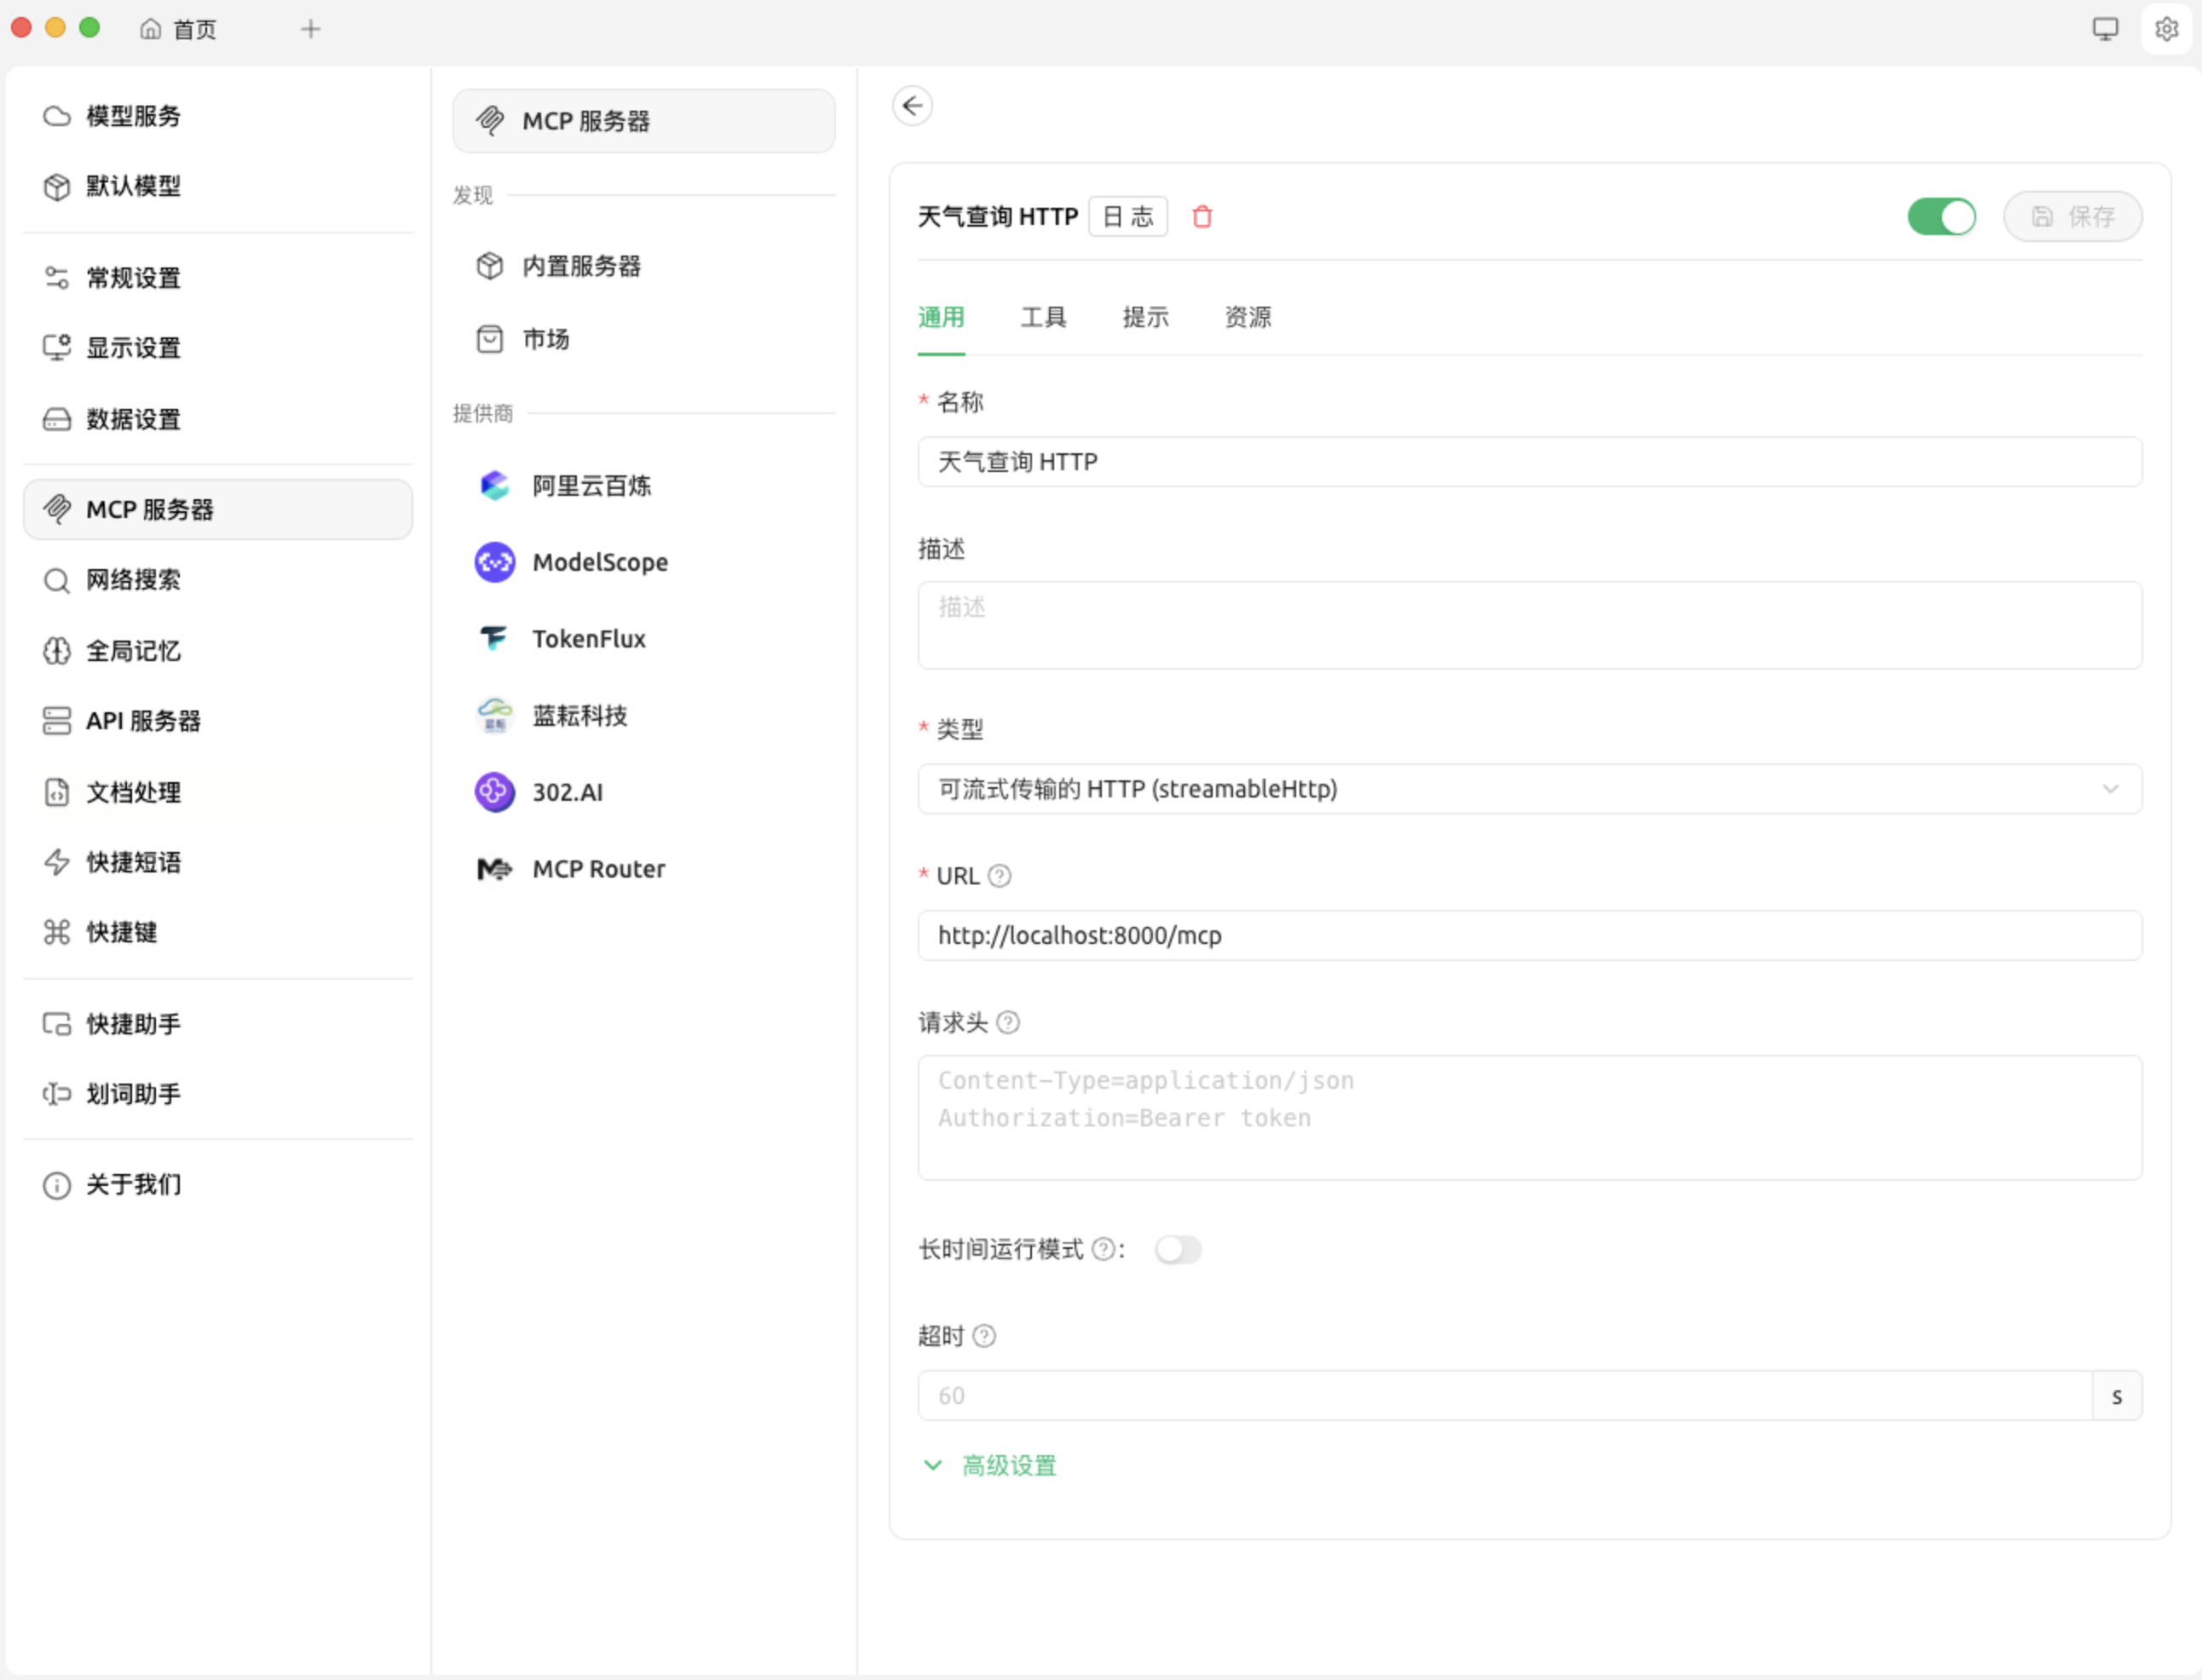
聊天应用连接该 MCP 的方式如下:
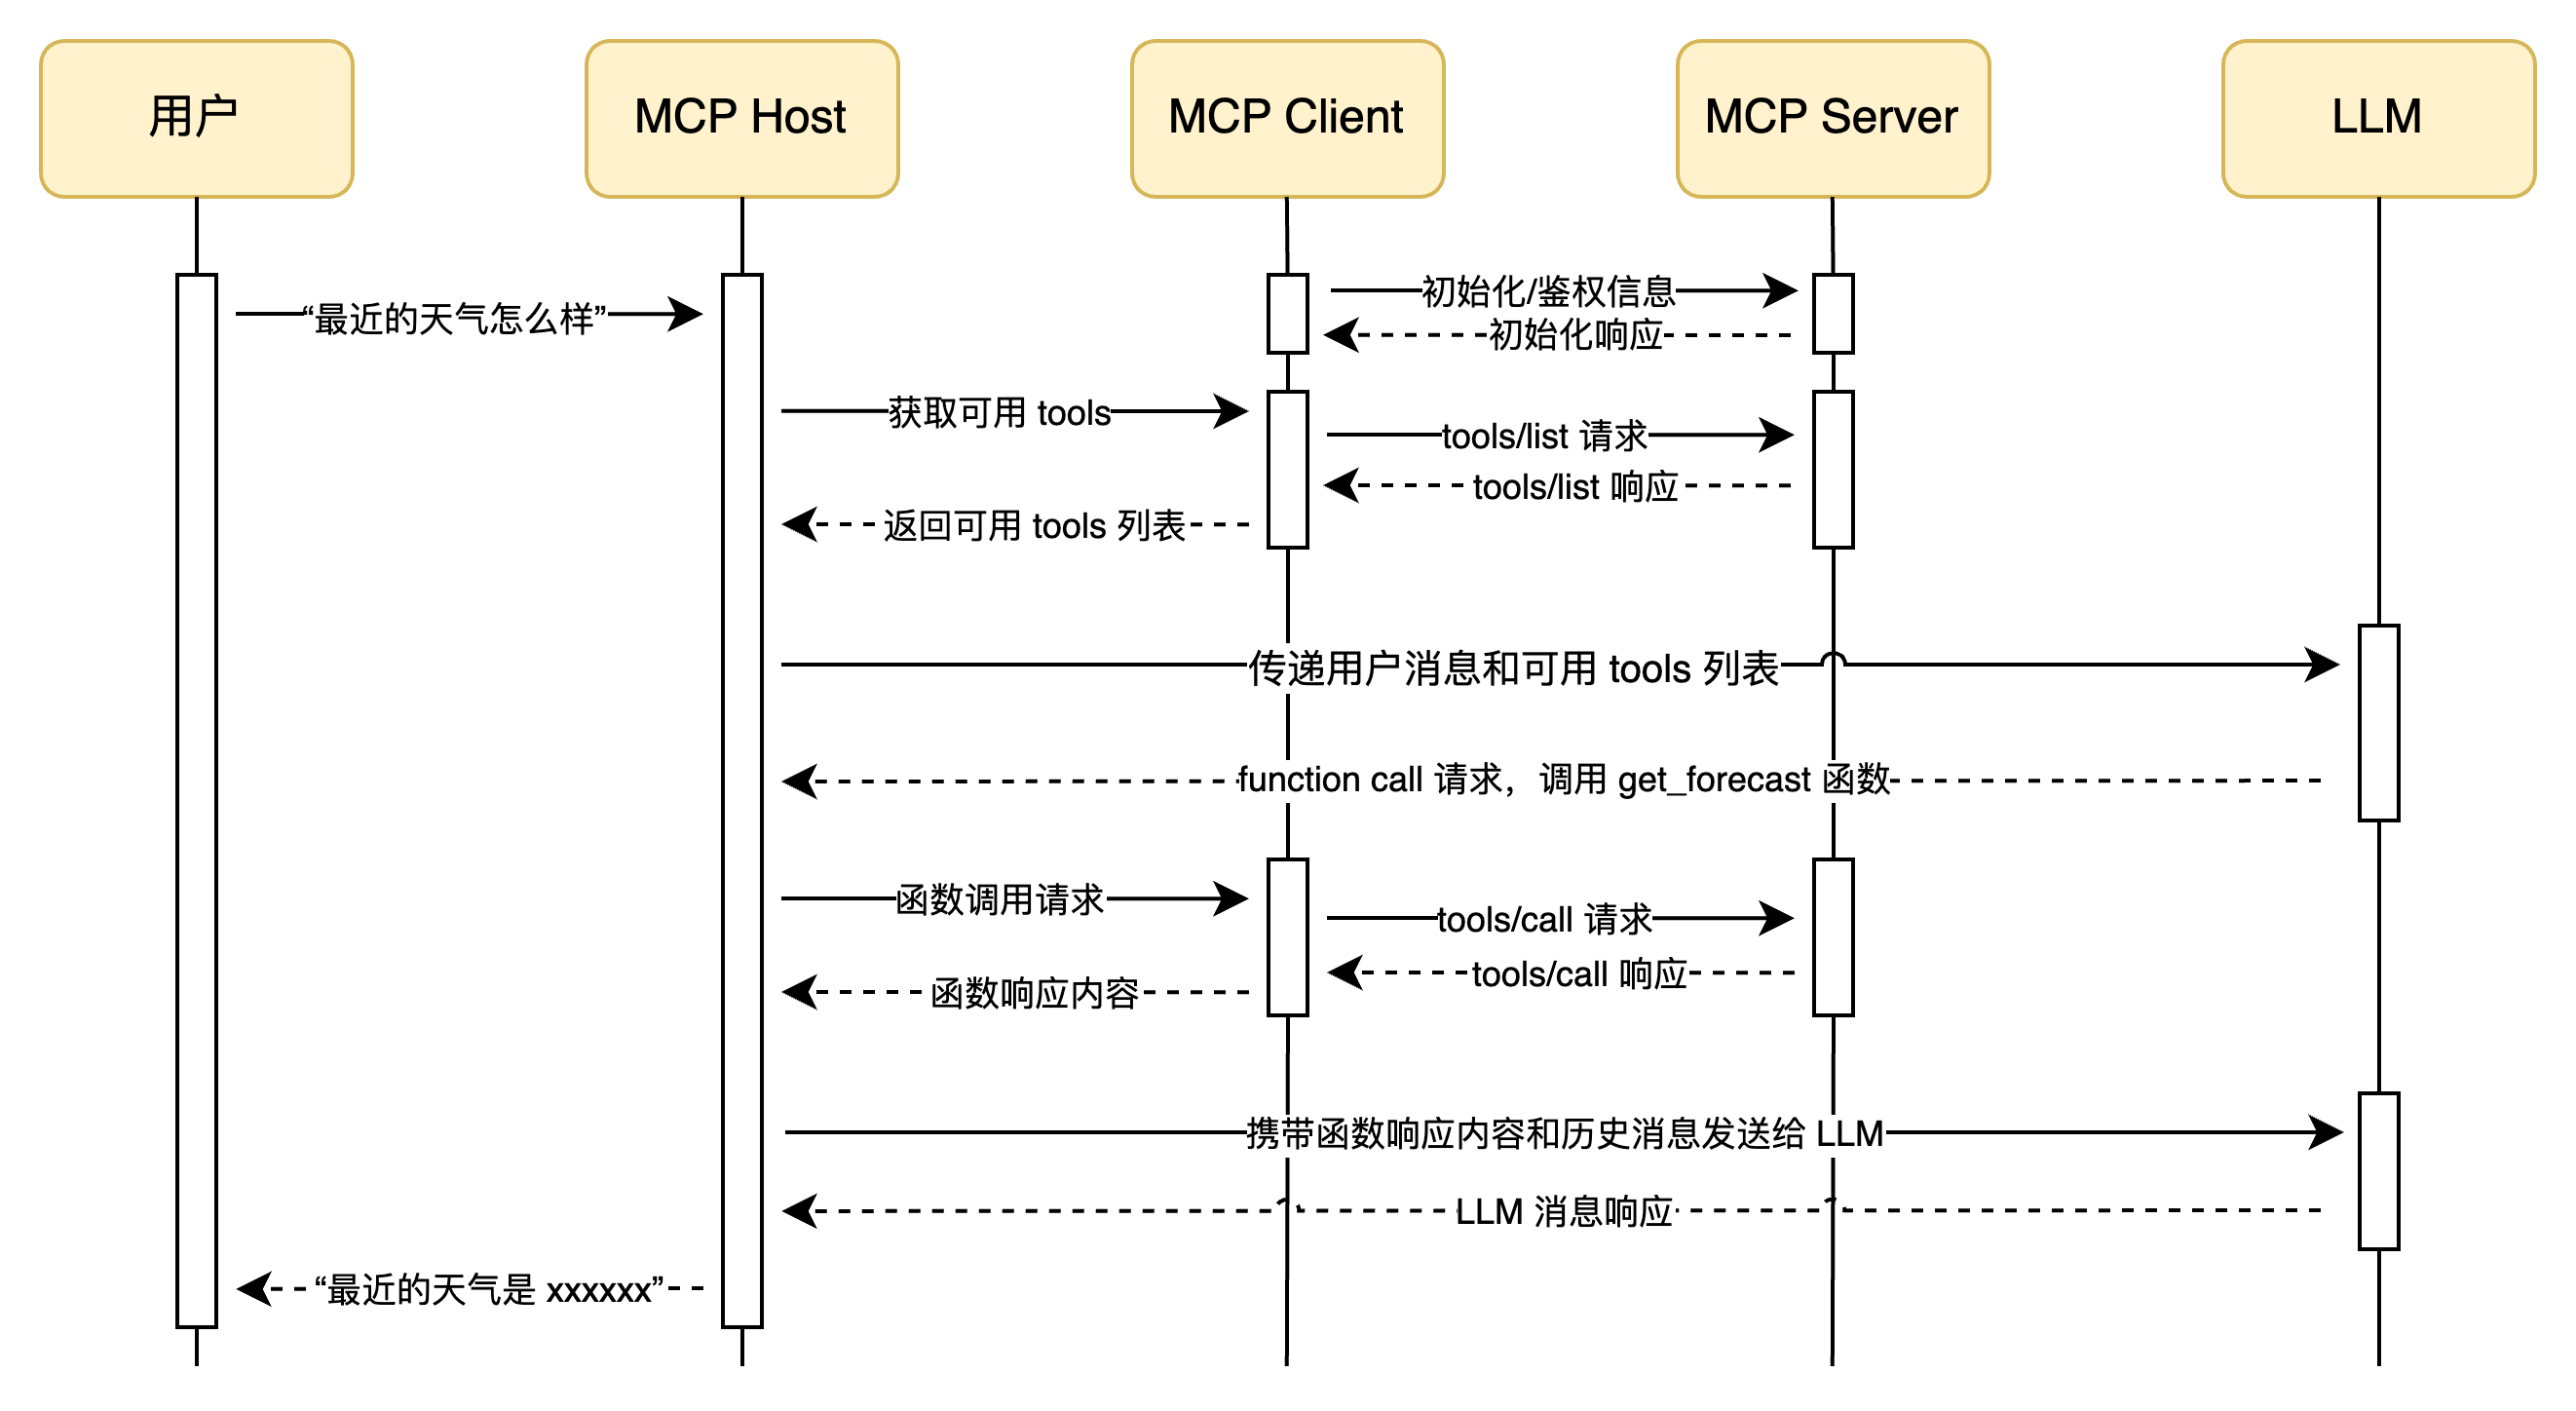
4. MCP Client 的实现 Client 的实现较为复杂,因为其既要负责 LLM 的函数调用请求,又要通知 MCP Server 执行函数,最后再将函数传递给 LLM,结合我们前面提过的 MCP Host 概念(也就是聊天软件),整体流程图如下:
MCP Client 连接 stdio 模式下的 MCP Server 的示例代码如下:
1
2
3
4
5
6
7
8
9
10
11
12
13
14
15
16
17
18
19
20
21
22
23
24
25
26
27
28
29
30
31
32
33
34
35
36
37
38
39
40
41
42
43
44
45
46
47
48
49
50
51
52
53
54
55
56
57
58
59
60
61
62
63
64
65
66
67
68
69
70
71
72
73
74
75
76
77
78
79
80
81
82
83
84
85
86
87
88
89
90
91
92
93
94
95
96
97
98
99
100
101
102
103
104
105
106
107
108
109
110
111
112
113
114
import { Client } from "@modelcontextprotocol/sdk/client" ;import { StdioClientTransport } from "@modelcontextprotocol/sdk/client/stdio.js" ;import { Model } from "./model.mjs" ;class McpClient { _mcp; _transport; _tools = []; _model; constructor (model ) { this ._model = model; this ._mcp = new Client ({ name : "mcp-client-demo" , version : "1.0.0" , }); } async connectToStdioMcp (command, args ) { console .log ("Connecting to MCP server via stdio..." ); this ._transport = new StdioClientTransport ({ command, args, }); await this ._mcp .connect (this ._transport ); console .log ("connected to MCP server via stdio." ); const toolsResult = await this ._mcp .listTools (); this ._tools = toolsResult.tools .map ((tool ) => { return { type : "function" , function : { name : tool.name , description : tool.description , parameters : tool.inputSchema , }, }; }); this ._model .updateTools (this ._tools ); console .log ( "LLM 可用 MCP Tools:" , this ._tools .map ((tool ) => tool.function .name ).join (", " ) ); } async processMessage (message ) { const messages = [ { role : "user" , content : [{ type : "text" , text : message }], }, ]; const response = await this ._model .chat (messages); return await this ._processResponse (response, messages); } async _processResponse (response, messages = [] ) { const toolCalls = response.tool_calls || []; if (toolCalls.length > 0 ) { messages.push (response); const toolName = toolCalls[0 ].function .name ; const toolArgs = JSON .parse ( toolCalls[0 ].function .arguments || "{}" ); const toolCallId = toolCalls[0 ].id ; console .log ( `LLM 请求调用工具: ${toolName} ,参数: ${JSON .stringify( toolArgs )} ` ); const result = await this ._mcp .callTool ({ name : toolName, arguments : toolArgs, }); console .log (`工具 ${toolName} 调用结果: ${JSON .stringify(result)} ` ); messages.push ({ role : "tool" , content : result.content , tool_call_id : toolCallId, }); console .log ("正在将工具调用结果反馈给大模型..." ); const newResponse = await this ._model .chat (messages); return await this ._processResponse (newResponse, messages); } else { return response.content ; } } } async function main ( const model = new Model ({ apiKey : "sk-aac**************2a6" , baseURL : "https://dashscope.aliyuncs.com/compatible-mode/v1" , model : "qwen-flash" , }); const mcpClient = new McpClient (model); await mcpClient.connectToStdioMcp ("node" , [ "/src/server/stdio.mjs" , ]); const result = await mcpClient.processMessage ("帮我查询一下最近北京的天气" ); console .log ("========== 回复结果 =========" ); console .log (result); } main ();
Model 对象的实现:
1 2 3 4 5 6 7 8 9 10 11 12 13 14 15 16 17 18 19 20 21 22 23 24 25 26 27 28 29 30 31 32 33 34 35 36 37 import OpenAI from "openai" ;export class Model { _openai; _tools; _model; constructor (options ) { const { apiKey, baseURL, model } = options || {}; this ._tools = []; this ._model = model; this ._openai = new OpenAI ({ apiKey, baseURL, }); } updateTools (tools ) { if (tools instanceof Array ) { this ._tools = tools; } } async chat (messages ) { if (!(messages instanceof Array )) { throw new Error ("messages 必须是数组" ); } const completion = await this ._openai .chat .completions .create ({ messages, tools : this ._tools , model : this ._model , reasoning_effort : "medium" , }); return completion.choices [0 ].message ; } }
控制台输出:
1
2
3
4
5
6
7
8
9
10
11
12
13
14
15
Connecting to MCP server via stdio... Weather MCP Server running on stdio connected to MCP server via stdio. LLM 可用 MCP Tools: get_forecast LLM 请求调用工具: get_forecast,参数: {"latitude":39.9042,"longitude":116.4074} 工具 get_forecast 调用结果: {"content":[{"type":"text","text":"Date: 2024-06-01,Temperature: 25°C,Condition: Sunny,-------\nDate: 2024-06-02,Temperature: 22°C,Condition: Cloudy,-------\nDate: 2024-06-03,Temperature: 20°C,Condition: Rainy,-------"}]} 正在将工具调用结果反馈给大模型... ========== 回复结果 ========= 以下是北京最近几天的天气预报: - **2024年6月1日**:晴天,气温25°C。 - **2024年6月2日**:多云,气温22°C。 - **2024年6月3日**:有雨,气温20°C。 建议根据天气变化合理安排出行,注意携带雨具。
5. 拆解 MCP 的通信 MCP Server 与 Client 之间通信的基本模式 MCP Server 与 Client 的通信其实也与用户与 LLM 的通信相似,其必须是具有高时效性、实时连接的、可双向通信的,之所以需要这样是处于以下考虑的:
MCP 的调用是频繁并且耗时的,因此连接必须快速响应,避免不必要的传输成本,比如网络开销;
Client 可以向 Server 发送消息,Server 也可以主动向 Client 发送消息,而并非必须基于 Request/Response 模式;
如果遇到较大的数据或者长耗时的任务,Client 和 Server 之间的数据传递可以以流的方式,进行一边处理消息,一边发送数据(尽管目前很多 MCP 都没实现这一点的应用);
简单来说,MCP Server 与 Client 之间必须创建一个实时通信的通道(官方称为 Transports ),双方可以实时的进行互相通信,至于这个通道的实现方式,MCP 官方 sdk 提供了 stdio 和 streamable http 两种。实际上只要实现了 Server 与 Client 之间通道的通信协议,也可以不拘于官方提供的两种方式,你可以创建自己的 Transport。
MCP Server 与 Client 之间的通信的建立与消息传递 我们先不讨论 Server 与 Client 之间通信的具体实现,先搞明白他们是怎么通信的,用的是什么报文、又是如何鉴权的、生命周期又是怎样的。
Server 与 Client 之间要进行通信就必须使一种约束好的报文格式,MCP 协议使用的报文格式就是 JSON-RPC,其是一种标准的 JSON 数据格式,专门用于服务与服务之间的远程调用。
当 Client 想要与 Server 建立通信时,必须有 Client 端发送一个初始化请求,其报文示例如下:
1
2
3
4
5
6
7
8
9
10
11
12
13
14
15
{ "jsonrpc" : "2.0" , "id" : 1 , "method" : "initialize" , "params" : { "protocolVersion" : "2025-06-18" , "capabilities" : { "elicitation" : { } } , "clientInfo" : { "name" : "example-client" , "version" : "1.0.0" } } }
Server 收到信息后,会对其做出响应,告知 Client 服务端所使用的协议版本、对外暴露的能力,如:
1
2
3
4
5
6
7
8
9
10
11
12
13
14
15
16
17
18
19
20
21
22
23
24
25
26
27
28
29
30
{ "result" : { "protocolVersion" : "2025-06-18" , "capabilities" : { "logging" : { } , "tasks" : { "requests" : { "tools" : { "call" : { } } } } , "tools" : { "listChanged" : true } , "prompts" : { "listChanged" : true } , "resources" : { "listChanged" : true } } , "serverInfo" : { "name" : "simple-streamable-http-server" , "version" : "1.0.0" , } } , "jsonrpc" : "2.0" , "id" : 1 }
然后客户端必须回应一个就绪的报文,表示通讯成功建立,就绪报文如下:
1
2
3
4
{ "jsonrpc" : "2.0" , "method" : "notifications/initialized" }
就绪报文没有任何响应,会返回 202 状态码,之后 Client 就可以远程调用 Server 提供的能力了,比如列出当前可用的 tools:
1
2
3
4
{ "jsonrpc" : "2.0" , "method" : "tools/list" }
服务端会返回 tools 列表:
1
2
3
4
5
6
7
8
9
10
11
12
13
14
15
16
17
18
19
20
21
22
23
24
25
26
27
28
29
30
{ "result" : { "tools" : [ { "name" : "greet" , "title" : "Greeting Tool" , "description" : "A simple greeting tool" , "inputSchema" : { "$schema" : "http://json-schema.org/draft-07/schema#" , "type" : "object" , "properties" : { "name" : { "description" : "Name to greet" , "type" : "string" } } , "required" : [ "name" ] } , "execution" : { "taskSupport" : "forbidden" } } , ] } , "jsonrpc" : "2.0" , "id" : 2 }
调用函数的报文如下:
1
2
3
4
5
6
7
8
9
10
11
{ "jsonrpc" : "2.0" , "id" : 3 , "method" : "tools/call" , "params" : { "name" : "multi-greet" , "arguments" : { "name" : "zhangsan" } } }
Server 返回函数的返回结果:
1
2
3
4
5
6
7
8
9
10
11
12
{ "result" : { "content" : [ { "type" : "text" , "text" : "Good morning, zhangsan!" } ] } , "jsonrpc" : "2.0" , "id" : 3 }
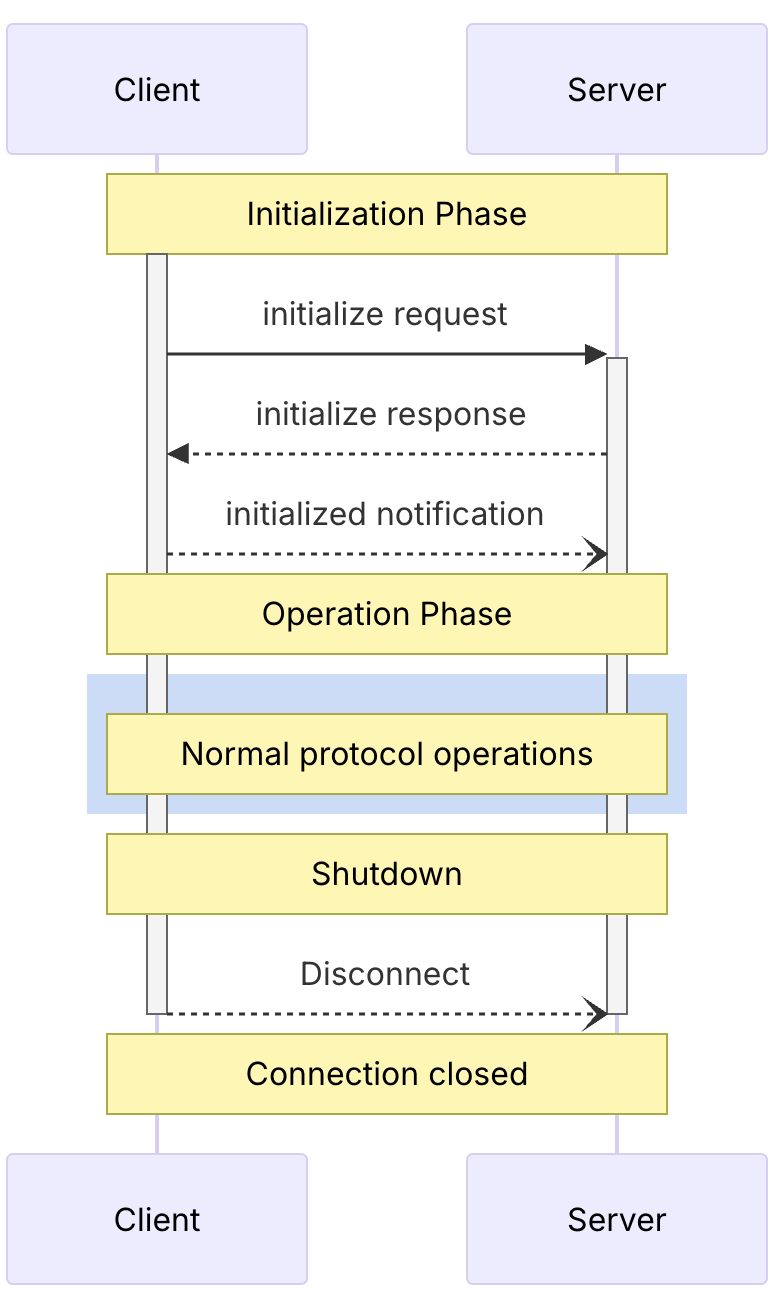
Client 与 Server 之间的生命周期流程如下:
更多的信息可以参考官方文档的这一章节
前面我们提过 MCP Server 的实现有两种方式,stdio 和 streamable http。stdio 天然支持上面我们所说的实时性,因为其完全是基于本地信息通信的,也具有双向传递的特征,可以随时 IO,因此我们不过多讲解。真正困难的是基于 http 传输的 streamable http 是如何实现的,接下来我们就对其进行详细的拆解。
SSE 传输模式的实现 在拆解 Streamable HTTP 传输模式之前我们先来聊聊 SSE。SSE 作为 MCP 旧的网络调用实现目前已经被弃用了,但是其理解比较简单且在 streamable http 中任然扮演着重要的角色,因此我们先来讨论 SSE。
SSE 的整体工作流程为:
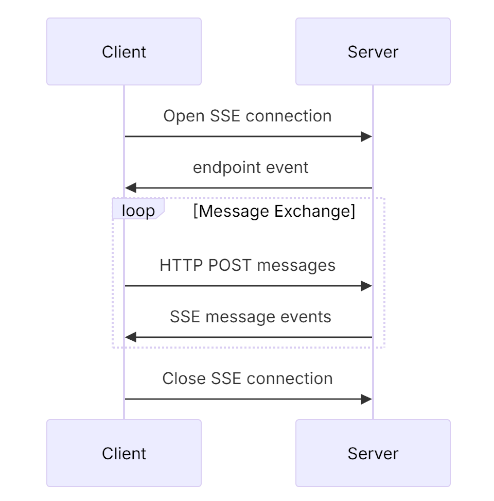
Client 向 Server 发起一个 GET 请求,Server 会与 Client 建立一个长链接,并使用 SSE 的方式向 Client 推送一个 POST 的请求路径(我们将其称为 POST 接入点),请求路径的 query 部分会携带一个 sessionId 用于标识会话;
如果客户端需要发起函数调用,如 tool/call 或者 tool/list,会使用 HTTP POST 请求调用上一步 Server 端返回的 POST 接入点,然后将 JSON-RPC 报文以请求体的方式传递给 Server,此时当前的 POST 请求会立即断开 ,等服务端的函数执行完成后,函数的结果会以 SSE 的方式推送给第一步建立的连接
整体的流程图如下:
我们不难看出,SSE 工作模式及其浪费资源,客户端与服务端通信要依赖一个长链接,如果客户端持续挂起,服务端的资源也会被一直占用,所以 SSE 被新的 MCP 规范抛弃了。
关于更多为什么使用 Streamable HTTP 替代 SSE 的讨论可以参考这篇文章 。
Streamable HTTP 传输模式的实现 相对于 SSE 传输模式,Streamable HTTP 回到了传统的 Request/Response 模式,只在必要的时候升级到 SSE,同时也支持了流式传输,可以为将来 MCP 支持大文件的输入输出做准备。
Streamable HTTP 整体的工作流程为:
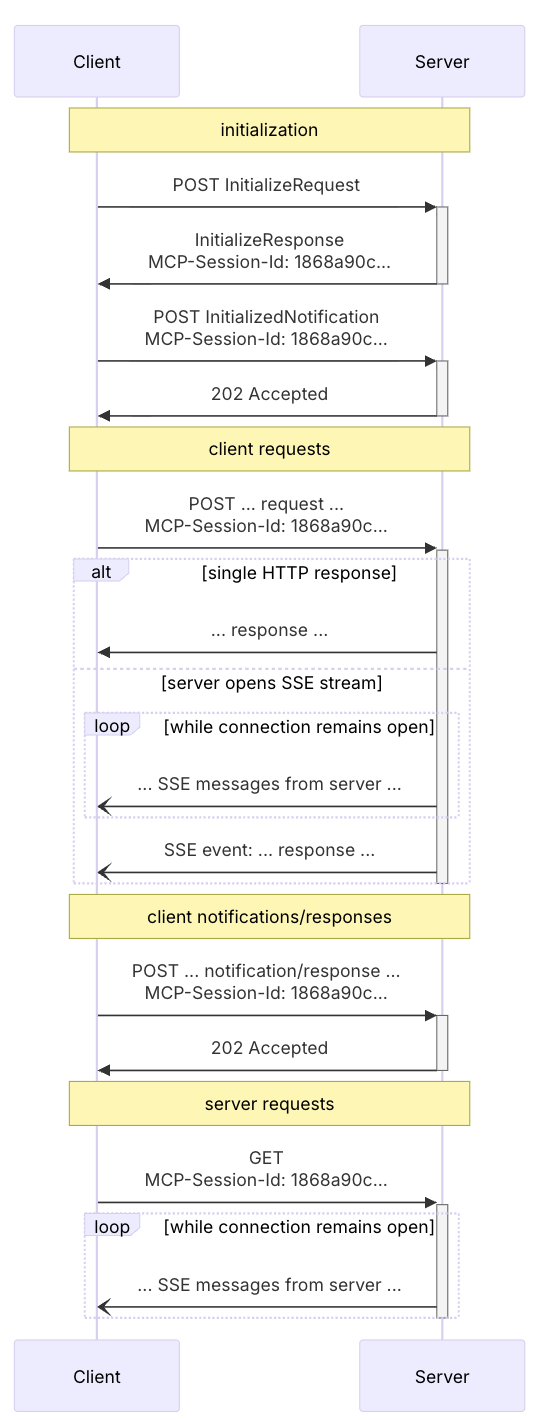
新模式下抛弃了 SSE 多接入点的设计,在 Streamable HTTP 模式下全程只有一个路径为 /mcp 的 POST 接入点。
首先 Client 会发送一个初始化 JSON-RCP 报文,请求头必须携带 accept: application/json, text/event-stream,Server 收到请求后,会在响应体中传入服务端的初始化信息,同时在响应头中插入一个 mcp-session-id 字段。
客户端缓存 mcp-session-id 字段,在后续的报文中都需要将其携带到请求头中;
客户端再发起一个就绪报文,服务端收到后立刻返回 202 响应,允许后续客户端的远程调用;
客户端如果需要调用函数,使用 POST 请求发送 JSON-RCP 到服务端即可。服务端处理函数调用时,会视情况决定使用 SSE 还是普通 HTTP Response 将数据传递给客户端;
流程图如下:
可以看出,在 Streamable HTTP 模式下,不需要建立 SSE 长连接,每次交互都是单纯的 Request/Response(或者是使用短的 SSE 连接,发送一条消息后就断开,取决你是否开启 enableJsonResponse),只在需要的时候使用 SSE 进行流式响应,并且在传输完一次数据后就会关闭连接,这对无状态服务是友好的。
此外,Streamable HTTP 也保留了 SSE 模式,服务端可以同时创建一个 GET 接入点来使用旧的纯 SSE 模式,亦或是如果需要 MCP Log 往 Clinet 推送,则也仍然需要 SSE,具体可参考官方 SDK 示例的实现 。但是如果你的服务是即抛即用无状态的,则不能使用 GET 接入点的 SSE。
6. 小结 MCP 不仅有 Tools 可以用,我们在 LLM 聊天软件中使用 / 出现的指令也是基于 MCP Server 提供的 Prompts 实现的,还有 MCP 提供的资源内容 Resource。MCP Client 端的实现也有提供 LLM 获取用户意图的 Elicitation、用于客户端指定服务器关注哪些目录的 Roots、以及 Sampling 等概念。
但是目前来说,MCP 运用的最广泛的还是 Tools 和 Prompts,其余概念都缺乏具体的实现参考,并且 MCP 仍然处于一个发展阶段,如果想要深入了解可以查阅 MCP 官方文档 ,本文就不再继续延伸。