本文将以 Google 登录流程为示例,演示前后端登录接入的实现方案
1. 整体流程
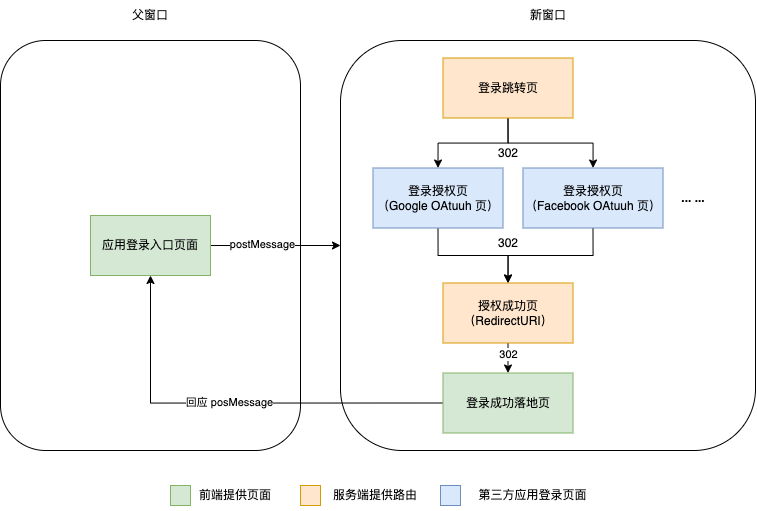
用户在 应用登录入口页面 点击登录按钮,浏览器调用 window.open 打开 登录跳转页 ,并使用 type 标记登录类型,如:https://auth.app.com/passport?type=google,此时 应用登录入口页面(也就是父页面) 要使用 postMessage 持续为打开的窗口发送消息,探测是否已经完成登录流程
服务端收到 /passport?type=google 的请求,构建 Google 的登录授权页 URL
用户输入账号信息,授权登录
Google 登录授权页 将授权 code 等信息作为 RedirectURI 的 url query 并将当前页面重定向到该页面到 授权成功页 ,如:https://auth.app.com/sign?type=google
如 RedirectURI 为 https://auth.app.com/sign?type=google(RedirectURI 需要在 Google API 服务控制面板添加到列表中),那么登录成功后,客户端浏览器会跳转到 https://auth.app.com/sign?type=google&code=xxx&scope=xxx&authuser=0&prompt=xxx 这个页面
授权成功页 被客户端访问后,服务端收到 /sign?type=google&code=xxx&... 的请求,解构 url query 中的信息,并调用 Google OAuth 接口获取到授权 AccessToken,并使用 AccessToken 获取用户信息(用户id、邮箱等)。服务端进行用户信息存取操作后,生成一个当前应用的 token(如使用 JWT 规范),并调用 setCookie 为客户端的根域名的 cookie 中植入 token,同时使用 302 重定向到一个 登录成功落地页 ,如 https://auth.app.com/auto_login.html
登录成功落地页 回应父窗口的 postMessage 信息,并关闭当前页面应用登录入口页面 收到来自 登录成功落地页 的回应,刷新当前页面(也可不用刷新)改变当前页面显示的用户登录态
上面描述的流程涉及如下几个页面,在此进行整理和说明:
应用登录入口页面 :即存在登录按钮的页面,负责打开后续登录窗口,并持续与登录窗口进行轮询通信。登录跳转页 :用户点击登录按钮后打开新窗口后首先访问的页面,负责向后台请求第三方应用(如 Google )的登录地址。登录授权页 :是第三方应用的登录页面,如 Google 的 OAuth 授权页面,用户在此界面选择账号进行授权或者输入 Google 的账号密码进行授权。授权成功页 :即为第三方账号授权成功后重定向到的目标页面,用于通知当前应用服务端授权成功。登录成功落地页 :一个空白页面,用于通知父窗口(应用登录入口页面)登录成功,同时关闭自身窗口。
2. 服务端实现 服务端主要实现两个路由,一个是 登录跳转页 的路由,用于按照请求类型重定向到第三方应用的登录界面。另外一个是 授权成功页 的路由,用于处理拿到用户后服务端的操作,并为客户端植入 cookie,同时重定向到登录成功落地页。
1
2
3
4
5
6
7
8
9
10
11
12
13
14
15
16
17
18
19
20
21
22
23
24
25
26
27
28
29
30
31
32
33
34
35
36
37
38
39
40
41
42
43
44
45
46
47
48
49
50
51
52
53
54
55
56
57
58
59
60
61
62
63
64
65
66
67
68
69
70
71
72
73
74
75
76
77
78
79
import { Router } from 'express' ;import { google } from 'googleapis' ;import { GOOGLE_OAUTH_CONFIG } from './config' ;const GOOGLE_OAUTH_CONFIG = { clientID : 'xxxxxx' , clientSecret : 'xxxxxx' , redirectUri : 'https://localhost:5173/api/oauth/sign?type=google' , scope : [ 'https://www.googleapis.com/auth/userinfo.profile' , 'https://www.googleapis.com/auth/userinfo.email' , ], }; const googleOAuth2Client = new google.auth .OAuth2 ( GOOGLE_OAUTH_CONFIG .clientID , GOOGLE_OAUTH_CONFIG .clientSecret , GOOGLE_OAUTH_CONFIG .redirectUri ); function getGoogleOAuthUrl ( return googleOAuth2Client.generateAuthUrl ({ access_type : 'offline' , scope : GOOGLE_OAUTH_CONFIG .scope , }); } const oAuthRouter = Router ();oAuthRouter.get ('/passport' , async (req, res, next) => { const { type } = req.query ; if (!type) { throw new Error ('缺少参数' ); } switch (type) { case 'google' : res.redirect (getGoogleOAuthUrl ()); break ; default : throw new Error ('不支持的登录类型' ); } }); oAuthRouter.get ('/sign' , async (req, res, next) => { const query = req.query ; if (!query.type ) { throw new Error ('缺少参数' ); } switch (query.type ) { case 'google' : const { tokens } = await googleOAuth2Client.getToken (query.code ); googleOAuth2Client.setCredentials (tokens); const { data } = await googleOAuth2Client.request ({ url : 'https://www.googleapis.com/oauth2/v1/userinfo' , }); const { id, name, email } = data as any; res.cookie ('user' , JSON .stringify ({ id, name, email })); res.redirect ('/auto_login.html' ); break ; default : throw new Error ('不支持的登录类型' ); } }); export default oAuthRouter;
2. 客户端实现 客户端应用登录入口页面的实现 1 2 3 4 5 6 7 8 9 10 11 12 13 14 15 16 17 18 19 20 21 22 23 24 25 26 27 28 29 30 31 32 33 34 35 36 37 38 39 40 41 42 43 44 45 46 47 48 49 50 51 52 53 54 55 56 57 58 59 60 61 62 63 64 65 66 67 68 69 70 71 72 73 74 75 76 77 78 79 80 81 <template> <div class="oauth-page"> <div class="card-area"> <el-button @click="onAuthBtnClick('google')">Google Auth</el-button> <el-button @click="onAuthBtnClick('facebook')">Facebook Auth</el-button> </div> <div v-if="userInfo" class="card-area"> {{ userInfo }} </div> </div> </template> <script lang="ts"> import { PickServerReq } from '@express-vue-template/types/api'; import { GET_OAUTH_PASSPORT_API, OAuthType, } from '@express-vue-template/types/api/oauth'; import { defineComponent } from 'vue'; export default defineComponent({ name: 'OAuthPage', setup() { const targetId = ref(new Date().valueOf().toString()); const oAuthWindow = ref<Window | null>(null); const userInfo = ref(); function onAuthBtnClick(authType: OAuthType) { // 构建登录跳转页 URL 并打开 const query = new URLSearchParams({ type: authType } as PickServerReq< typeof GET_OAUTH_PASSPORT_API >); const url = `${window.location.origin}/api/oauth/passport?${query}`; const newWindow = window.open( url, targetId.value, 'width=500,height=500' ); if (newWindow) { oAuthWindow.value = newWindow; } // 对新窗口进行 postMessage 轮询,验证是否授权完成 setInterval(() => { newWindow?.postMessage('is-auth-finished', '*'); }, 1000); } function onReceivedMessage(event: MessageEvent) { // 收到登录成功的消息后,关闭登录窗口并获取用户信息 if (event.data === 'auth-finished') { oAuthWindow.value?.close(); getUserInfo(); } } function getUserInfo() { // 读取服务端种的 cookie(简单示例,生产环境下应调用接口获取用户信息) const userCookie = document.cookie .split('; ') .find((row) => row.startsWith('user=')); if (userCookie) { userInfo.value = userCookie.split('=')[1]; } } onMounted(() => { window.addEventListener('message', onReceivedMessage); getUserInfo(); }); onUnmounted(() => { window.removeEventListener('message', onReceivedMessage); }); return { onAuthBtnClick, userInfo, }; }, }); </script>
登录成功落地页 当登录成功后,会跳转到 /auto_login.html 页面,这是一个简单的 HTML 页面,只用于与父页面进行通信(或进行其他后续必要操作):
1
2
3
4
5
6
7
8
9
10
11
12
13
14
15
16
17
18
19
20
<!DOCTYPE html > <html lang ="en" > <head > <meta charset ="UTF-8" /> <meta http-equiv ="X-UA-Compatible" content ="IE=edge" /> <meta name ="viewport" content ="width=device-width, initial-scale=1.0" /> <title > Login... ...</title > </head > <body > Loading... ... <script > window .addEventListener ('message' , (event ) => { if (event.data === 'is-auth-finished' ) { event.source .postMessage ('auth-finished' , '*' ); } }); </script > </body > </html >